DESIGN PROJECTS
Project 1: Converting motion; mechanisms and pullies
(Deadline: 5:00 PM Wednesday March 10th)Goal: Build a system of pullies that would allow you to apply small amount of force to lift a jug of one-gallon water and move it from its original location to a location at least one foot away.
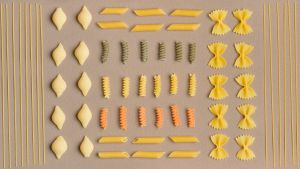
Materials to use: Spaghetti, pasta, glue, strings/ropes, plastic jug of water. Depending on your final design, you may also need a board, a rod, or some weights to secure your design in place, but remember that they are to secure the entire design or parts of it, in place and cannot be part of the original design.
Report, verification and demonstration/presentation: A full report that include the design drawings and building is expected along with a video that captures portions of your effort at some of the stages of building your prototype plus a power point presentation is expected by the due date. An online presentation of at most 10 minutes should be scheduled through the available time slots.[ Link ]
Testing and compliance criteria: The design should accomplish the required movement task with the following considerations:
a) - all required parts for the design must be made using spaghetti/pasta nodles that can be glued
together individually or as a whole, including wheels, beams, and supporting connections. Only liquid
glue to be used. Using of hot glue gun is allowed.
b) - to apply force to lift the jug and move, you may not use your hand directly. You can vreate a
handle, a rod, or any other device, all made from the same materials of the design, to use to pull the
rope/string or to push parts of the design.
c) - you can try twice during demonstration, if the first one fails.
Looking for ideas: Aside from resources discussed in the class, you can begin by watching,
"Why Snatch Blocks are AWESOME (How Pulleys Work) - Smarter Every Day 228" video from SmarterEveryDay
YouTube channel [ Link ].
There are many videos and web site that discuss bridge
and crane building ideas using similar materials of this project. Here is a couple of them:
Spaghetti crane project video from Federico Uribe channel
[ Link ], or,
[ Link ],
[ Link ] and many more.
Adjustments to design requirements:
a) - short of real emergencies (accidents, arrests, abuction by extra terresterial aliens, ...),
you must meet the project deadline, no excuse is accepted.
b) - If you cannot meet the design deadline you can partially relax the requirements so the design
can meet the deadline. Any compromise on the requirements will incurr penalties but it is better
than not meeting the deadline. Example of such relaxation of requirements are: a 16 ounce bottle
instead of a one-gallon jug, use of tape rolls instead of liquid glue, lifting but not moving the jug, etc.

Project 2: Prototype Design
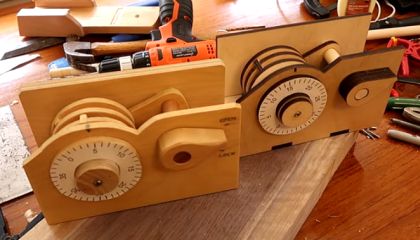
(Deadline: 5:00 PM Wednesday March 24th)Goal: Build a combination lock system from wood (preferred) or cardboardand demonstrate that it works.
Familiarize yourself with the concepts: 1. Begin by watching several videos and read some informative
web sites about combination locks and how they work. Here are a couple of examples but there are many more that you might
want to explore by yourself.
How does a Combination Lock work? (Jared Owen) [ Link ]
and
Combination lock (Wikipedia) [ Link ]
Explore sample designs: Watch a number of videos that show how some designs are constructed.
Depending on what you have access or willing to spend you may choose one of the following designs or another one
that you find more appropriate for your skills. Some of these designs are very basic and some are easy but require tools.
Wooden combination lock build (Matthias Wandel) [
Link ]
Combination Lock (Scott Rumschlag) [ Link ]
Wooden combination lock (Marco Nidi) [ Link ]
How to make Safe with Combination Number Lock from cardboard (BigWR) [ Link ]
or,
How to Make Safe with Combination Lock from Cardboard (The Q) [ Link ]
How to make safe using Cardboard (DIY Ocean) [ Link ]
How to Make a Cardboard Safe with Combination Lock (Mr K) [ Link ]
Build a Combination Vault - Tinker Crate (KiwiCo) [ Link ]
Build and submit: Upload to your shared drive, a full report including drawings with measurements
(no hand drawn sketches -- must use CAD), in PDF, that fully explains the concepts of your final product, steps of building
and materials used with a finished cost of manufacturing for the product along with a short video showing you in stages of
building the prototype by the deadline identified for the project.
Present: Schedule a presentation date for the project. Upload the PowerPoint presentation you are using to your shared drive before scheduled presentation date.
Grades will be assigned based on:
1. adherance to the guidelines
2. quality of assembled design
3. creativity in modifying and enhancing the design
4. performance
5. presentation
6. report
Project 3: Reverse Engineering
(Deadline: 5:00 PM Wednesday April 7th)Goal: Reverse engineer a product (needs pre-approval) of your choice (some restrictions apply).
Explore and familiarize yourself with the concepts: Study reverse engineering concepts
(your textbook, professional journals, internet resources, etc. and make yourself familiar with steps of
the process. Watch several videos of projects available on YouTube or read about them on web sites.
Here are examples but there are many more that you might want to explore by yourself.
Reverse Engineering Project Disassemble, Sketch, Recap (TeachEngineering)
[ Link ]
and
What Is Reverse Engineering and How Does It Work? (Astro Machine Works)
[ Link ]
or,
What Is Reverse Engineering? (Physical Digital)
[ Link ]
A good source of ideas may also come from watching some YouTube channels that deal with restoration of old rusty products. Random Hands channel [ Link ], my mechanics channel [ Link ], Restoration T - D channel [ Link ], and OLD SMITH [ Link ], are good examples but as mentioned ealier, there are many more.
Select a product: Find a product around your residence, or buy it from a store, flea market, garage sale, etc. It is not important how old it is or whether it works or not. As long as you have tools to disassemble and reassemble it, you might be able to use it for your project. Do not use working appliances that you may not be able to put them back together. Do not use electronic based devices that include only few parts other than the electronic boards and assembly. Do not use products that include a lrage number of parts. Do not use products that include a small number of parts. Obtain pre-approval from the instructor.
Disassembly/Reassembly: Disassemble the product, and lay them on a table or floor. Make sure you record the steps in a table so you can follow the same steps to reassemble them. design a layout foe the assembly station that would allow you to use your both hands to reassemble the product. Reassemble the product.
Submit: Upload to your shared drive, a full report including drawings with measurements (CAD drawings are preferred, but quality hand drawn sketches are also acceptable), in PDF, that fully explains the concepts of your reverse engineering of your product, steps of disassembly and reassembly and assembly station design along with a short video showing you in stages of disassembly and reassembly of the product. (Check Project 1 for more details)
Present: Schedule a presentation date for the project. Upload the PowerPoint presentation you are using to your shared drive before scheduled presentation date.

Project 4: QFD and HoQ
Group project; presentation due before the final exam (the the last class); grades based on contributions to the projectGoal: To create a House of Quality for a designated product
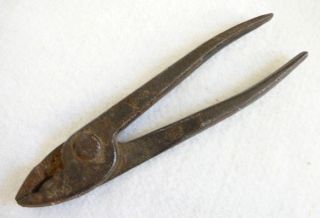
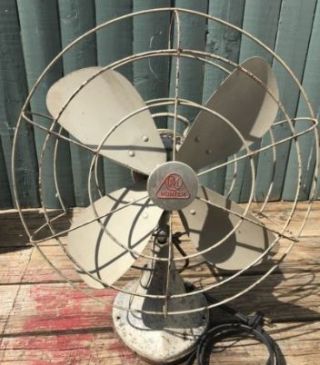
Form your group and meet to assign tasks to group members: There are 21 registered members in this class. Although, only about 15-17 members show up for the classes and about 10-12 members who submit work required. We are going to have two groups each with a specific product assigned to them. First group, Plier Masters, will include students whose last name begins with one of the letters A through G (10 students). The rest will belong to Guard Masters group. Form your group and meet online. Record your meetings. I am leaving it to group members to coordinate among themselves how they would like to communicate as a group.
Products to be redesigned: A plier and an ocillating fan guard
Guideline to follow: Chapter 3 of the textbook
Customer requirements: The products assigned have been chosen so you can easily identify the customer requirements by comparing the product with what is in the market today. Your group must come up with 12-15 items that are considered feedback from customers. Then create a survey and send it to all class members to get responses that would allow you to rand the ones that are considered important or very important and continue from there.
Group member contribution: Your report should include member contribution to the final project.