Module Three
Each module presents few useful links mostly related to the materials that will be discussed during that module. These links are by no means the best or the most comprehensive links. They are presented here as a starting point. You may do your own search on the Internet to find the the sites that suit your learning style the best.
- Will be added later
- Will be added later
Module Three discussions in the class are focused toward 5 basic subjects:
- A review of the topics of the first two modules will be presented. We will elaborate elaborate on the IMG tag and incorporating the images into the HTML documents. We will also explore Frame tag and designing Web pages incorporating frames.
- Image is the most important aspect of a multimedia project. Sometimes an image transfers so much information that several pages of written document cannot. Images can easily break the barriers of communication between people. And for that reason alone, they should be our main tool in developing multimedia projects. Images can be sequenced together in frames so that when viewed reasonably fast (15-24 frames per second) it will create the perception of motion.
- Images can range from two simple level of black and white to true color (16.7 million colors). Depending on the need you can save your images in any level of color depth that you are interested. However, when you save them they must be in one of the two standards: either the GIF extension (pronounced jeef) or JPG (pronounced jey-peg). GIF files have a 256 level of color and JPG files are 16.7 million color depth. All browsers recognize these two formats and that is what you want to stay with.
- What is incredible about these formats is their file size as opposed to, say, a BMP (bit map--Windows image extension) image. You can follow a simple guideline on when to choose a JPG format for an image, and when to choose a GIF format. Since the file size does not differ much, anytime the image you are presenting has to be presented in detail levels of colors, you have to represent it in JPG format. Your own picture, probably is a good example. On the other hand, if the image is a simple drawing or an image to just grab the attention, such as a button, a bar, a color bullet and so on, you want to represent it in GIF. Anywhere in between the two extremes is really your preference, it does not make much of a difference in loading time. Few years ago, my general recommendation was to go with GIF because most Internet users did not have good video graphics cards and thus were not able to see the color depth of JPG files anyway. Today, it is a totally different situation. Many games, programs, and operating systems are really power hungry. They require more and more, hard disk space, more RAM, better graphics display system and so on. It is now only the simplicity of working with lower color levels that make GIF files more attractive...and of course, you should not forget the animated GIFs either. There are some technical aspect of GIF compression that also provide us with some advantages, but that is something that will be covered in other places.
- We will also work with a software called Ejay Express to create music...It will be fun.
The images that we use for our multimedia projects, including those for the web pages, may come from different sources.There are excellent image processing software packages available on the market. By far the best one is Adobe Photoshop. Not only is it an excellent image processing software package, it also works with many 3-D and animation software packages as a plug-in. However, its price range is sometimes discouraging. On the other hand, excellent image processing programs are now available that have provided much cheaper alternatives to Adobe Photoshop. I have selected Paint Shop Pro for our image processing.
- By scanning an image from printed material (whether paper or film). In this case a scanner is used to transform the analog image into a digital one. The source of the image could be a picture taken with a regular camera, a painting, or any other picture. It is amazing how low the prices have gone on scanners. You can now buy reasonably good flatbed scanners for under $50 (some even with rebates!).
- You can alternatively take the pictures using a digital camera. It is again the same story, with the prices falling down to under $200. Obviously, if you are looking for professional high end digital cameras, the price range can go to as high as $10,000.
- Another option is to copy and save images that are available on the Web. The major problem in here is the issue of copyright. We will cover the copyright issue, later in the semester, but in general be very careful when you copy an image that someone else has made.
- Finally, the best and most reliable method is to create your own images using an image processing program.
For the purpose of creating and editing images for the World Wide Web, Paint Shop Pro is an excellent choice. Its lower price, and its ability to convert many different image file formats is a huge advantage over other types of image processors.
There are several tutorials for Paint Shop Pro on the Web. You can check weekly assignments of the active participants to this course for links to a number of sites containing such tutorials. I have a tutorial for an older version of Paint Shop Pro that you may want to start from there and then check others for additional materials and techniques. The current version of Paintshop Pro is 8. Click here for the Paint Shop Pro tutorial. Click here for the HTML tutorial.
To record and play sounds on your computer you need to have a sound card, a set of speakers, and a microphone. Most soundcards usually come with additional software that would allow you to record and play audio files. Some even allows you to edit the files. In this course however, we will use Windows Sound Recorder for basic voice recording and will use Sound Forge for professional sound editing.Assuming that you already have a soundcard installed and it is in working condition:
You should now be able to use the microphone with utilities such as the Windows Sound Recorder.
- Plug the microphone into the into the MIC jack on the back of the sound card.
- Double click on the speaker icon (next to the clock in lower right corner of the screen) on the Windows Taskbar. This will bring up the Master Volume control.
- Click on Options, choose Properties, and select Recording. Make sure there are check marks in Microphone box and click OK.
- Move the Microphone slider all the way up. The Microphone Select box should be checked.
- Click the Advanced button and check the 1 Mic Auto (or 20db) Gain Control box. Click the Close button.
- Click on Options and choose Properties. Choose Other. Make sure there is a check mark in the Microphone box and Click OK.
- Move the Microphone slider all the way up. Click the Advanced button, check the 1 Mic Auto Gain Control box, and click the Close button.
- Click on Options and choose Properties. Choose Playback and click OK. Close the Master Volume control utility.
Click on Start/Programs/Accessories/Multimedia/Sound Recorder.
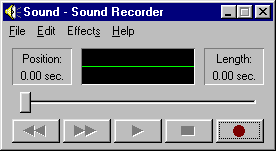
A sound recorder window will open. As usual check the menu items and make yourself familiar with the submenu items.
Click on the Record button
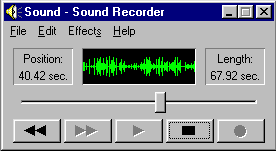
and start recording. "One, two, three. One, two, three. Testing. Testing...". Notice whether actual testing takes place by checking the green waves in the small black window of the Sound Recorder as seen here.
Click on the Rewind button
and then on the Play button to hear your recording.
By default, Sound Recorder can record up to one minute. However when you stop recording it will only uses the actual amount of recording time. In case you decided to continue recording, Sound Recorder will not start a new recording, but rather it will add it to the previous ones until the 60 seconds is completed, at which time it stops automatically. If you wanted to start a new recording, you should use the File/New option from the menu.
Editing
Click on the Rewind button to go to the start of the sound. From the menu choose Edit/Copy. This will copy the whole sound to the clipboard. Again from the menu choose Edit/Paste Insert. The clipboard will be added to the end of the current file doubling its size. Listen to the audio.Now move the slider to the somewhere between the two ends (not the middle). From the menu select Edit/Paste Mix. The clipboard will be added to the current sound from the location of the slider toward the end of the file. Listen to the new composite audio and notice how mixing has generated a different sound. You can repeat this process with Edit/Insert File and Edit/Mix with File, where instead of a sound from clipboard, you will be using a sound file with an extension of .WAV, which is the Microsoft Windows audio file format.
Next try the submenu options under Effects and listen to the result of different selections such as adding echo. Next click on File/Save As and save your file. The file by default will have a .WAV extension. At the bottom of the Save As window, notice the Properties button. Currently the file will be saved as "PCM 22050 Hz, 8 Bit, Mono". You can change those values if you want. We will discuss the technical aspects of file formats later in the course, but you might want to save the file in several different formats and then check their sizes for comparison purposes.
Although, Windows sound recording has come a long way from its crude form in Windows 3.1, it still is very basic and is by no means appropriate for professional audio recording/editing. An excellent sound editing software available for PC is Sound Forge but it is also expensive. There are also many shareware and some freeware programs available for download from the Web.
Assignment for Module Three consists of different steps with an expectation of 7-8 hours of work for a novice participant. It is located at the end of the HTML tutorials for this module.


