Module Two
Each module presents few useful links mostly related to the materials that will be discussed during that module. These links are by no means the best or the most comprehensive links. They are presented here as a starting point. You may do your own search on the Internet to find the the sites that suit your learning style the best.
- Use AceHTML Webs site to download the latest freeware version AceHTML. AceHTML is among tens of freely available HTML editors that would allow you to edit your HTML documents. For a list of others you may check the general download site, two of which was listed in Module one.
- Check JASC Software the creator of Paint Shop Pro to tutorials and other information on the software. You may also use Abstract Dimensions or Smallworks Web sites for additional tutorials on Paint Shop Pro. A simple search on the Internet reveal many other sites. Here is one resulted from the search using Google.
- Use Meta Tags Dictioary or Web Developer Meta Tag Tutorial or Meta Tag Creator Page for Meta tag reference and tutorials.
Module Two discussions in the class are focused toward 5 basic subjects:
- A review of the topics of the first module will be presented. The important role that the Web plays on the future of education and training will be stressed again.
- A discussion will take place that to enhance learning, when the intent is to teach through the Web, the materials must be presented in such a way that stimulates learning. So, a main focus for us is to know "How People Learn" which would help us design the course materials in a way to take advantage of people's different learning styles. Obviously, the same is true for a business environment, except that sales and service replaces teaching and learning.
- Additional HTML tags will be introduced and the presentation of tags will begin to become formal. However, we will still be using a non technical language in dealing with the HTML tags.
So far, you have
In this module we:
- set up basic homepage for the class.
- created links to other documents within your index.html file, and
- have implemented a number of tags related to the text formatting.
- practice incorporating color into our documents, whether as background color or the text color.
- learn where to find images, how to save them, and how to incorporate them into our web documents.
- practice working off-line to take advantage of the power of our pc, as opposed to working directly in a UNIX environment,
- start using formal tag definitions.
Where did you say it was?
One important point that must be mentioned here is the correct form of identifying the location of a document to be used in a tag. Generally, for those who start to create web pages, there are not very many documents, images, sounds, etc. But, as you start adding up more pages and collecting more images, soon you will realize that finding a specific file in your directory will not be such an easy task.The general recommendation is to create specialized sub-directories that contain a group of similar objects. As an example, let's see how a part of my web directory is organized:
- Within my web directory, I have several sub-directories. Two of them are: images, and courses.
- The images sub-directory, itself has several sub-directories including one called icons. This sub-directory contains most of the backgrounds, buttons, arrows, under construction signs, bars, and similar images.
- The courses subdirectory itself include among other things a subdirectory called IEGR455 which in turns it contains an images sub-directory as well as a sub-directory named ap that contains the materials related to the active participants, including the same document that you are reading now--module_2.html.
- So if decided to use a left arrow, for example, in this document, I have to make sure that the correct address is given to the browser which in turn will display the image properly. Consider the following five images below:
As you notice, only one of the images is displayed properly. The others were not displayed not because the image file does not exist in my site, but because it is not where the browser is looking for it (or to be correct, it is not where I told the browser to look for it).
- Analyzing what happened above should provide you enough information to deal with the addressing issue. As I said earlier my web pages have some special sub-directories. They look like what you see below.
my web directory
    |
    | ....
    | index.html
    | ....
    |
    |_____images
    |       |
    |       |
    |       |_____icons
    |       |        |
    |       |        | b_left_1.gif
    |       |        |
    |       |        :
    |
    |
    |
    |_____courses
    |        |
    |        |
    |        |_____IEGR455
    |        |         | ...
    |        |         | index.html
    |        |         | ...
    |        |         |_____images
    |        |         |       |
    |        |         |       |
    |        |         |       |____icons
    |        |         |       |       | ...
    |        |         |       |       | ...
    |        |         |       |       :
    |        |         |
    |        |         |
    |        |         |______ap
    |        |         |       | ...
    |        |         |       | index.html
    |        |         |       | ...
    |        |         |       | module_2.html
    |        |         |       | ...
    |        |         |       :
Notice that I am within the module_2.html file and giving an address to the browser where the file b_left_1.gif can be found.
In the first instance, I gave this address:
This is what I told the browser of how to find the image file:
In case you followed the directory structure, you would see that the address is correct and the file exists on that directory. That is why the first image is displayed correctly. Now analyze why the second, third and fourth images were not displayed, using a similar approach as the above. Here are the addresses that I used for other images:
- From the current location (where module_2.html is located or sub-directory ap) go up one level in the directory hierarchy (that is what the first two dots represent)
- At that level (i.e., the IEGR455 sub-directory) go one level higher (second set of two dots) which would take you to courses subdirectory.
- At that level (i.e., the courses sub-directory) go one level higher (third set of two dots) which would take you to "my web directory"
- In there find a sub-directory called images and go into it
- When at the images sub-directory, seek another sub-directory called icons
- And when you reach the icons sub-directory find an image file named b_left_1.gif.
3rd one ../images/icons/b_left_1.gif
4th one images/icons/b_left_1.gif
5th one b_left_1.gif

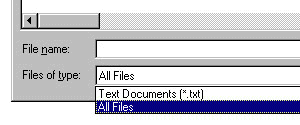
Whether you are working with a UNIX shell, or with an Microsoft Windows server, you should seriously consider working off-line. That is, instead of connecting to the server, try to create/edit your HTML documents on your PC. You get the convenience and power of your PC, which is devoted only to your work as opposed to a server which has to share its resources across the net.Remember that HTML documents are ASCII files, so you can choose Windows Notepad to create and save those programs. Make sure that whether you are saving, or opening files with Notepad, in the "Files of Type" field select "All Files" Option.
There are lots of specialized HTML editors which would provide additional features that sometimes are very useful. Almost all word processors now have some sort of conversion program that can convert your documents to an HTML ready file. In addition many stand-alone programs are also available to do the same thing. You can get a list of many of the freefare or shareware programs from download places such as TUCOWS.
We will later discuss professional software such as FrontPage and Dream Weaver but if you do not have access to them, freeware/shareware programs are always available. One such program, AceHTML, is available for free download. It provides ample freedom for designing Web pages and would allow you to work in visual environment.
It is now time to also mention the major problem with most professional HTML editors and converters. To see the problem, it is enough to look at one of the converted files from Microsoft Excel or Word. It looks like a jungle of HTML tags. Hardly editable and very difficult to understand. You better be not thinking about major editing of the HTML document, or you will have a real headache figuring out what to change and where. In fact, the easier way is to go back to the word processor or spreadsheet, change the original file, and convert it again. You must also be really good at realizing the features that are browser specific and may not work in both major browsers. this is specially true for Microsoft Internet Explorer that uses many Dynamic HTML tags and characteristics that are not approved in standard HTML.
Module Two tutorials concerns the introduction of tables, and some multimedia tags using the HTML language plus an additional set of miscellaneous tags that might help you improve the look of the document. Click here to start the tutorials.
Assignment for Module Two consists of different steps with an expectation of 7-8 hours of work for a novice participant.
- Study the instructional materials for Module Two.
- Post your assignments to your IEGR455 directory, per guidelines. Note that assignments are at different locations including some at the bottom of HTML tutorials for this module.
- Make sure that ALL HTML documents that you have generated so far or will be generating from now on, has at least one or two meta tags in them.
Visit the EDUPAGE site and bookmark it for further references. Take a look at issues of Edupage from Edupage listserv archives link and select at least one specific month (all issues for that month). From the issues of that months select the news items that you think are most related to our goals in this class. Write a short essay giving a brief description of the news items you chose, and mention why you thought they were important.
- Search the web for materials related to learning styles. specifically, we are interested in the following topics:
- different learning styles
- tests for learning styles
- differences in adult and children learning
- effect of computer based instruction on learning
- Use AceHTML to create an HTML format of your weekly class schedule. Look at the source of the file and indicate 10 things that you would have not done if you had written the HTML document using Notepade.
- Write a short and simple tutorial of how you transfer a file to your IEGR455 directory. How much explanation is needed? Use this as a guideline: "If a freshman college student sat behind YOUR computer, he/she would be able to accomplish the work using only your instructions." If you really need an incentive, add this to it," The document is the only copy of evidence that will prove the innocence of a man wrongly convicted of a crime he has not committed and will be executed in 10 minutes unless the judge sees the document on your web page." And you thought this class had no cliffhangers...think again!