We were introduced to the following tags in the HTML Tutorials of Units 1 and 2:
html head title body center bold italic headings paragraph break superscript subscript ordered lists unnumbered list definition list blockquote font em strong big small pre a img In our first part of the tutorial this week, we will expand on the inventory of the tags that we learned by introducing additional tags which can help improve a web page, making it a bit more interesting. A word of caution in here is to make sure that you know the trade-offs before loading your document with special features. The more you put these widgets on your page the less the possibility that people actually visit or read it because of the long download time.
If the purpose is to create a document that others read, many of the so-called page enhancing tags, will cause great download time for regular users of the Internet. A page with a sound background is very nice, but if I have to wait 5 minutes for the page to load via a modem connection, I may simply choose to press the stop button and go somewhere else. On the other hand, if I expect my audience to be advance computer users and or people with access to hi bandwidth (cable, DSL, etc.), I may choose to go ahead and not worry about the size of the files to be downloaded.
Menu and Dir Lists:In the first module tutorials, we studied UL, OL, and Definition lists. The Menu and Dir tags work similar to the UL tag. The only difference is that items listed in these lists are restricted to at most 20 characters in size. Otherwise, no major differences exists. Here is examples of both lists.
<MENU>
<LI>salad
<LI>soup
<LI>juice
</MENU>
Which will be displayed as:
And this is an example of DIR list:
<DIR>
<LI>president
<LI>dean
<LI>faculty
</DIR>
Which will be displayed as:
president dean faculty
Embedding Sounds and Other Objects in Web Pages
BGSOUND
BGSOUND tag provides a background sound for your web page. Its format is very simple.
<BGSOUND LOOP=n SRC=url>
Sounds can either be samples (i.e., .wav or .mp3 format) or MIDI format.n in the LOOP represents how many times a sound will loop when the page is accessed or reloaded. To play the background sound continuously, use -1 or infinite for the n value.
url specifies the address of a sound to be displayed, the same way that you addressed an image file.
There are many collections of sounds and music on the Web. Search for some, and if you find something that you like, download it to your account and use it in your Module Two assignment page. If you did not find anything on the net!!!! you can check the link given in the first module.
To save a sound that you like, right click on the link and save the target or the file to your PC. Try it with the following sounds that I have in here for you.
Here is an example of bgsound application. Try it now. Did you try it? Did you hear the music? If you did not hear any music you must be using Netscape. BGSOUND is unfortunately a tag that only one of the two major browser supports.
EMBED
EMBED tag indicates an embedded object. The most useful format is:
<EMBED HEIGHT=n PALETTE=#rgb|#rgb
SRC=url WIDTH=n AUTOSTART=true|false
PLAYBACK=true|false></EMBED>
In the above tag the values used for the PALETTE, (i.e., #rgb|#rgb ) set the color palette to the foreground and background color respectively. For example, PALETTE=#ff0000|#00ff00 sets the foreground color to red and the background color to green.Take a look at the same example that we used for BGSOUND, but this time with the EMBED tag.
Remember that objects are not restricted to sound only, they can be movies, VRML files, Shockwave or Flash applications and many many more. Here is another example with embedding an AVI object in the HTML document.
Tables are among the most useful elements of HTML. They allow you real control over how a page should look like on different platforms. Although, as a web page designer, you still do not have total control over how different users on different platform will see your page, to a large extent, you can design it with tables to look similar on different platform. As an example, if you wanted to design a page which can be seen page width (from margin to margin without scrolling left and right), you may design your materials inside a table that would fit a 14-inch monitor (width=640 or less). Since, most people use the minimum of 640x480 resolution, you hope that, this would work. Obviously, users have a choice over the font size, and can easily ruin your plans by using a large font size.There is also another problem with tables that may discourage you from using it. Some older browsers, have difficulty with tables, especially when you introduce formatting elements inside the cells. Those browsers, tend to show nothing on the page, showing the page as a blank page.
Adding to this, you must be aware that Netscape browser is very sensitive to mistakes when it comes to tables and the places in which you place them. Internet Explorer, is not that harsh on you and often will compensate for your simple mistakes. So, you need to be careful and make sure to check your page with both browsers, before releasing it to the public.
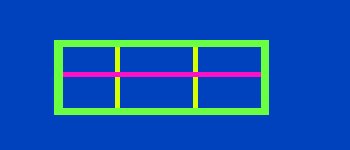
Design of tables are very easy for those who have had exposure to matrices. It should also be easy for those who like crossword puzzles! I always use the analogy of building a rectangle divided into smaller rectangles by horizontal and vertical lines. Horizontal lines separate the larger rectangle into ROWs and vertical lines, separate it into COLUMNs. For example the following table has two rows and 3 columns.
Three basic tags, define a table, and all of them should be present to define a table. These tags are:
All of them need the end tag.
- <table>
- <tr>
- <td>
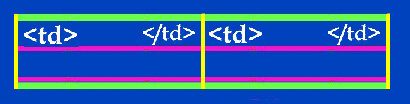
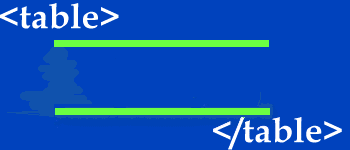
To construct a table you need to start with the <table> tag. You may think of it as defining the outside top (roof) and bottom (foundation) of the rectangle.
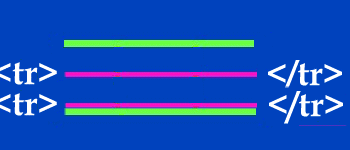
The next element required is the <tr> tag. You may think of it as defining the floors of the rectangle. In the following picture, we need two sets of <tr> tags to define the two rows (floors).
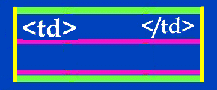
The next element required is the <td> tag. You may think of it as defining the left and right (and middle) walls of the rectangle. In the first example below, only one set of <td> tags are required for each row, and in the second one, two sets for each row.
So the following table which has one row and two columns can is represented by its HTML tags below.
<table>
<tr>
<td>
Baltimore
</td>
<td>
Maryland
</td>
</tr>
</table>The above set of tags will result in the following table:
Baltimore Maryland Which of course you can center with the center tag.
Baltimore Maryland Here is a two by two table:
<table>
<tr>
<td>Multimedia</td>
<td>is</td>
</tr>
<tr>
<td>really</td>
<td>fun</td>
</tr>
</table>
Which will show up as:
Multimedia is really fun Notice a number of things:
- The width of the cells in a column are all the same and are set according to the widest cell entry of that column. For example the first column's width depends on the word "Multimedia" where the width of the second column depend on the width of the word "fun".
- The width of the table depends on the total width of the columns.
- The entries are all left justified and there is not much space between the words in the first row (i.e., 'Multimedia' and 'is')
Furthermore, look at the following table, in which I have inserted an image in one of the cells.
Multimedia is really, really fun Again, notice that not only the width of a column depends on the width of its largest entry, but a height of a row is also dependent upon the height of its largest entry. You should also notice the text "really, really fun" is now shown at the left, center of the first cell of the second row.
Now let us look at a formal definition of a the table tag for its most useful attributes and options.
<TABLE ALIGN=align BACKGROUND=url
BGCOLOR=color BORDER=n CELLPADDING=n
CELLSPACING=n WIDTH=n>
The useful values of align are LEFT, CENTER, RIGHT specifying the table alignment with the LEFT as the default meaning the table is left aligned. So, we can use align to center a table in the page, instead of using <center> tag. Here is the same example used earlier but with align option.
Multimedia is really fun You can also put a picture in the background of a table by specifying it in the BACKGROUND option. The picture is then tiled behind the text and graphics in the table, table head, or table cell (this document that you are reading now has a background image which create the background of a college-rule notebook paper). Many designers prefer the BGCOLOR option. Again, similar to previous cases, we can assign the hexadecimal values for the red-green-blue to be the background color of the table. Again see the same example, with an additional BGCOLOR to the table tag (set to be EEEEEE in this example).
Multimedia is really fun You can define a border value for the table by identifying the n value in the BORDER. n will represent the number of pixels around the image used for the border. You noticed that the default value was zero. Here is the same example again where border is set to be 2..
Multimedia is really fun Notice that, there is not enough distance between the cells. CELLSPACING value (again in pixels), provides the solution. Again the same example but with the added option of CELLSPACING (set to be 5 in this example).
Multimedia is really fun We also notice that the text seems to be starting right after the left wall of the cell. We can provide a cushion around the walls of the cell, using the CELLPADDING option. Here is the same example, but with a cellpadding added to the table tag (set to be 15 in this example).
Multimedia is really fun Finally, you notice that the width of the table still depends on what is inside the cells. We can change that value and assign a specified width to the table using the WIDTH attribute. Similar to previous usage of the WIDTH, n can be a number (pixels) or a percentage (of the window). Again the same example, but with the addition of a width attribute.
Multimedia is really fun Notice that the size of the table has increased, but the cells have been widened proportionally.
Both <tr> and <td> tags also have attributes that can be very useful when designing with tables. The <tr> tag has the following format:
<TR ALIGN=align BGCOLOR=color VALIGN=valign >
The values of align are CENTER, LEFT, RIGHT, and JUSTIFY which sets the alignment for text in the row. The default is LEFT. Let us examine an earlier example using align attribute in a <tr> tag.
Multimedia is really, really fun Notice how both entries in the second row are aligned to the right of their cells.
The values of valign are MIDDLE, TOP, BOTTOM, BASELINE, which set the vertical alignment for text in the row. The default is MIDDLE. Again the same example, but with an additional VALIGN attribute in the <tr> tag.
Multimedia is really, really fun The use of the BGCOLOR is similar to previous cases. Here the previous example, with an added BGCOLOR in the <tr> tag.
Multimedia is really, really fun The <td> tag also has many useful attributes. The general format with some of its useful attributes is given below.
<TD ALIGN=align BACKGROUND=url
BGCOLOR=color COLSPAN=n HEIGHT=n
ROWSPAN=n VALIGN=valign WIDTH=n>
Three new attributes in here give the <td> tag special characteristics. They are HEIGHT, ROWSPAN, and COLSPAN. First let us look at the previous example, incorporating WIDTH, and BGCOLOR.
Multimedia is really, really fun To increase the height of the cells we can use the HEIGHT attribute. Again n is in pixels. Here is the modified example.
Multimedia is really, really fun Now consider, the following table:
The above table has 4 rows and 3 columns. But notice how the first cells of the second and third row are merged. The same is true for the last cells of the first and second column. In such cases we need to use two very useful attributes of the <td> tag namely ROWSPAN and COLSPAN. ROWSPAN, extends the content of a cell into cells in the n-1 adjoining rows below. COLSPAN does similar thing but with the columns.
For example, in the above table, we should define the first row with three cells, the second row will be defined with three cells as well with one difference. The first TD statement has a ROWSPAN=2. Now when we get to the third row we should recognize that the first cell is already defined through the cell in the second row. Therefore, we only need to define two cells for this row. In the last row, we will define the first cell, but then we will span it over two columns using COLSPAN=2. Now there is only one more cell left to be defined. Below is the actual HTML statements for a table similar to the above, and its actual implementation following the statements.
<table align=center>
<tr>
<td width=75 height=50 bgcolor=#ff0000></td>
<td width=75 bgcolor=#ff75ae></td>
<td width=75 bgcolor=#dd00ff></td>
</tr>
<tr>
<td width=75 bgcolor=#ffff00 rowspan=2></td>
<td width=75 height=50 bgcolor=#00ff00></td>
<td width=75 bgcolor=#ffffff></td>
</tr>
<tr>
<td width=75 height=50 bgcolor=#00ffff></td>
<td width=75 bgcolor=#000000></td>
</tr>
<tr>
<td height=50 bgcolor=#0000ff colspan=2></td>
<td width=75 bgcolor=#ffaf32></td>
</tr>
</table>
. . . . . . . Here is another example. In this example, we need to make sure to count the correct number of rows and columns. I will not reproduce the HTML code for you here. If you are interested, you can check the source of the current document for the code.
. . . . . . . .
As stated before, I do most of my pages using tables. For actual examples of the use of ROWSPAN and COLSPAN you can check my main homepage which is designed using tables.